目录
六 RabbitMQ工作模式
6.1Hello World简单模式
6.1.1 什么是简单模式
6.1.2 RabbitMQ管理界面操作
6.1.3 生产者代码
6.1.4 消费者代码
6.2 Work queues工作队列模式
6.2.1 什么是工作队列模式
6.2.2 RabbitMQ管理界面操作
6.2.3 生产者代码
6.2.4 消费者代码
6.3 三种模式概览
6.4 Publish/Subscribe发布与订阅模式
6.4.1 什么是发布订阅模式
6.4.2 RabbitMQ管理界面操作
6.4.3 生产者代码
6.4.4 消费者代码
6.5 Routing路由模式
6.5.1 什么是路由模式
6.5.2 RabbitMQ管理界面操作
6.5.3 生产者代码
6.5.4 消费者代码
6.6 Topics通配符模式(主题模式)
6.6.1 什么是通配符(主题)模式
6.6.2 RabbitMQ管理界面操作
6.6.3 生产者代码
6.6.4 消费者代码
6.7 模式总结RabbitMQ
6.8 使用代码创建队列和交换机
6.8.1 初始化exchange、queue
6.8.2 发布消息到RabbitMQ
6.8.3 创建消费者监听消息
官方文档 RabbitMQ Documentation | RabbitMQ
MQ全称为Message Queue,消息队列是应用程序和应用程序之间的通信方法。
RabbitMQ是一个Erlang开发的AMQP(高级消息排队 协议)(英文全称:Advanced Message Queuing Protocol )的开源实现。-------------接上章
六 RabbitMQ工作模式
6.1Hello World简单模式
6.1.1 什么是简单模式

在上图的模型中,有以下概念:
P:生产者: 也就是要发送消息的程序
C:消费者:消息的接受者,会一直等待消息到来。
queue:消息队列,图中红色部分。类似一个邮箱,可以缓存消息;生产者向其中投递消息,消费者从其中取出消息。
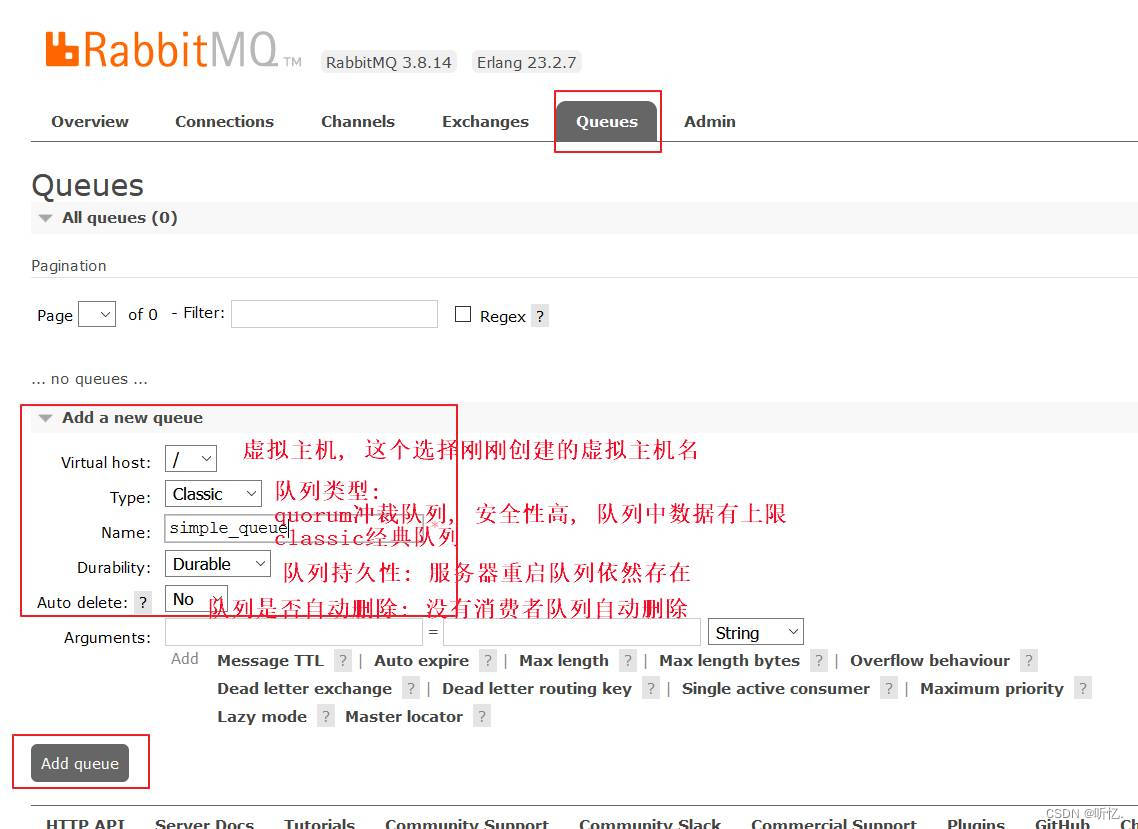
6.1.2 RabbitMQ管理界面操作
-
创建simple_queue队列用于演示Hello World简单模式
6.1.3 生产者代码
-
rabbitmq_producer项目测试代码如下:
package com.tingyi.test;
import com.tingyi.rabbitmq.ProducerApplication;
import org.junit.Test;
import org.junit.runner.RunWith;
import org.springframework.amqp.rabbit.core.RabbitTemplate;
import org.springframework.beans.factory.annotation.Autowired;
import org.springframework.boot.test.context.SpringBootTest;
import org.springframework.test.context.junit4.SpringRunner;
/**
* @author 听忆
*/
@SpringBootTest(classes = ProducerApplication.class)
@RunWith(SpringRunner.class)
public class TestSimple {
@Autowired
private RabbitTemplate rabbitTemplate;
@Test
public void testSimpleSend() {
rabbitTemplate.convertAndSend("simple_queue", "你好哇, 听忆!");
}
}6.1.4 消费者代码
-
rabbitmq_consumer项目创建监听器:
@Component
@RabbitListener(queues = "simple_queue")
public class SimpleListen {
@RabbitHandler
public void onMessage(String message){
System.out.println(message);
}
}然后启动ConsumerApplication.java, 就可以接收到RabbitMQ服务器发送来的消息
6.2 Work queues工作队列模式
6.2.1 什么是工作队列模式
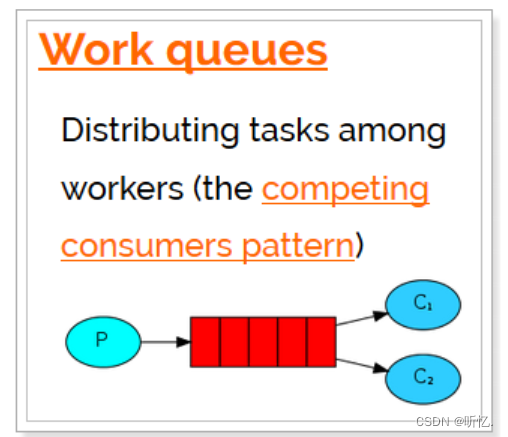
Work Queues与入门程序的简单模式相比,多了一个或一些消费端,多个消费端共同消费同一个队列中的消息。应用场景:对于任务过重或任务较多情况使用工作队列可以提高任务处理的速度。
在一个队列中如果有多个消费者,那么消费者之间对于同一个消息的关系是竞争的关系。
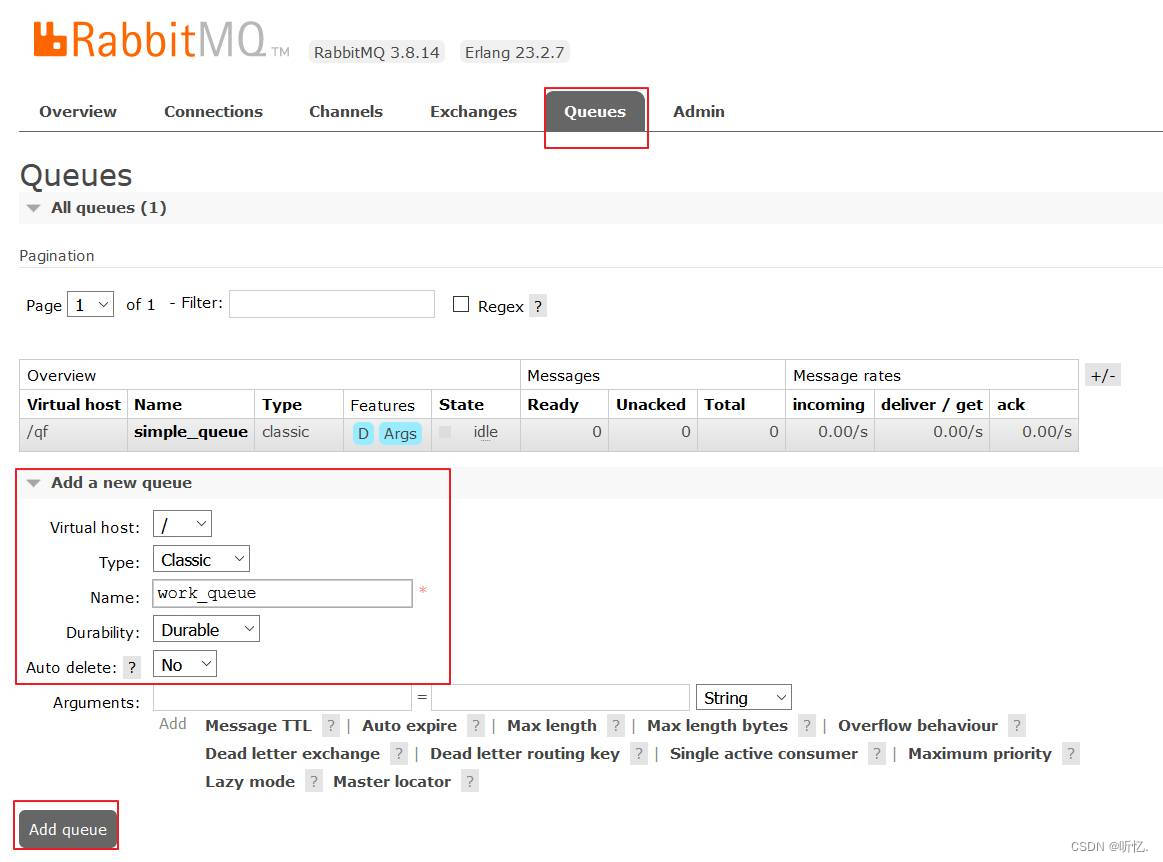
6.2.2 RabbitMQ管理界面操作
-
创建
work_queue队列用于演示work工作队列模式
6.2.3 生产者代码
rabbitmq_producer项目测试代码如下:
package com.qf.test;
import com.tingyi.rabbitmq.ProducerApplication;
import org.junit.Test;99
import org.junit.runner.RunWith;
import org.springframework.amqp.rabbit.core.RabbitTemplate;
import org.springframework.beans.factory.annotation.Autowired;
import org.springframework.boot.test.context.SpringBootTest;
import org.springframework.test.context.junit4.SpringRunner;
/**
* @author 听忆
*/
@SpringBootTest(classes = ProducerApplication.class)
@RunWith(SpringRunner.class)
public class TestWork {
@Autowired
private RabbitTemplate rabbitTemplate;
@Test
public void testWorkSend() {
for (int i = 0; i < 1000; i++){
rabbitTemplate.convertAndSend("work_queue", "你好哇, 听忆" + i);
}
}
}6.2.4 消费者代码
-
rabbitmq_consumer项目创建监听器1:
package com.tingyi.rabbitmq.work;
import org.springframework.amqp.rabbit.annotation.RabbitHandler;
import org.springframework.amqp.rabbit.annotation.RabbitListener;
import org.springframework.stereotype.Component;
/**
* @author 听忆
*/
@Component
@RabbitListener(queues = "work_queue")
public class WorkListener1 {
@RabbitHandler
public void testListener(String message) {
System.out.println("======WorkListener1接收到的消息为:======" + message);
}
}-
rabbitmq_consumer项目创建监听器2:
package com.tingyi.rabbitmq.work;
import org.springframework.amqp.rabbit.annotation.RabbitHandler;
import org.springframework.amqp.rabbit.annotation.RabbitListener;
import org.springframework.stereotype.Component;
/**
* @author 听忆
*/
@Component
@RabbitListener(queues = "work_queue")
public class WorkListener2 {
@RabbitHandler
public void testListener(String message) {
System.out.println("======WorkListener2接收到的消息为:======" + message);
}
}6.3 三种模式概览

前面2个案例中,只有3个角色:
-
P:生产者,也就是要发送消息的程序
-
C:消费者:消息的接受者,会一直等待消息到 来。
-
queue:消息队列,图中红色部分
而在订阅模型中,多了一个exchange角色,而且过程略有变化:
-
P:生产者,也就是要发送消息的程序,但是不再发送到队列中,而是发给X(交换机)
-
C:消费者,消息的接受者,会一直等待消息到来。
-
Queue:消息队列,接收消息、缓存消息。
-
Exchange:交换机,图中的X。一方面,接收生产者发送的消息。另一方面,知道如何处理消息,例如递交给某个特别队列、递交给所有队列、或是将消息丢弃。到底如何操作,取决于Exchange的类型。
Exchange有常见以下3种类型:
-
Fanout:广播 将消息交给所有绑定到交换机的队列, 不处理路由键。只需要简单的将队列绑定到交换机上。fanout 类型交换机转发消息是最快的。
-
Direct:定向 把消息交给符合指定routing key 的队列. 处理路由键。需要将一个队列绑定到交换机上,要求该消息与一个特定的路由键完全匹配。如果一个队列绑定到该交换机上要求路由键 “dog”,则只有被标记为 “dog” 的消息才被转发,不会转发 dog.puppy,也不会转发 dog.guard,只会转发dog。
其中,路由模式使用的是 direct 类型的交换机。
-
Topic:主题(通配符) 把消息交给符合routing pattern(路由模式)的队列. 将路由键和某模式进行匹配。此时队列需要绑定要一个模式上。符号
#匹配一个或多个词,符号*匹配不多不少一个词。因此“audit.#” 能够匹配到“audit.irs.corporate”,但是“audit.*” 只会匹配到 “audit.irs”。
其中,主题模式(通配符模式)使用的是 topic 类型的交换机。
-
Exchange(交换机)只负责转发消息,不具备存储消息的能力,因此如果没有任何队列与Exchange绑定,或者没有符合路由规则的队列,那么消息会丢失
6.4 Publish/Subscribe发布与订阅模式
6.4.1 什么是发布订阅模式

发布订阅模式:
1、每个消费者监听自己的队列。
2、生产者将消息发给broker,由交换机将消息转发到绑定此交换机的每个队列,每个绑定交换机的队列都将接收到消息
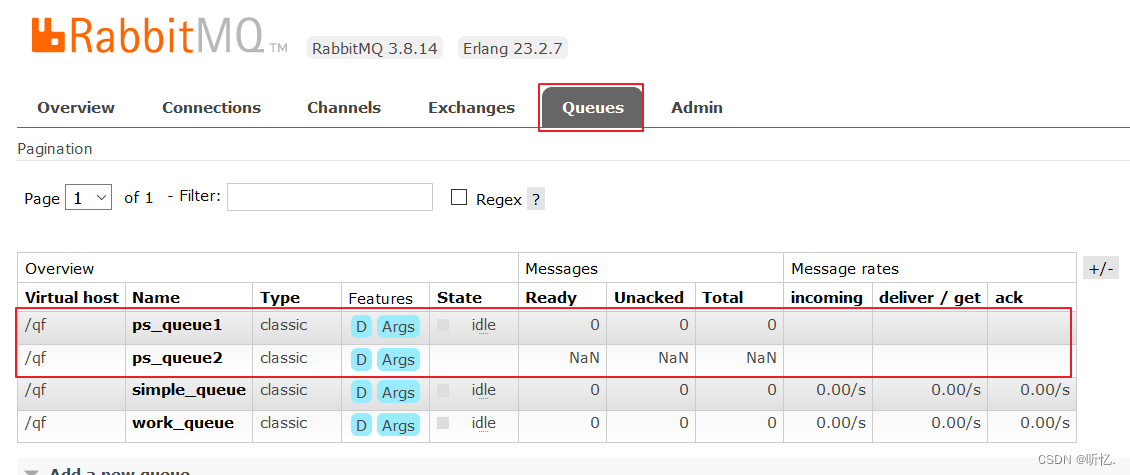
6.4.2 RabbitMQ管理界面操作
-
创建两个队列
ps_queue1和ps_queue2
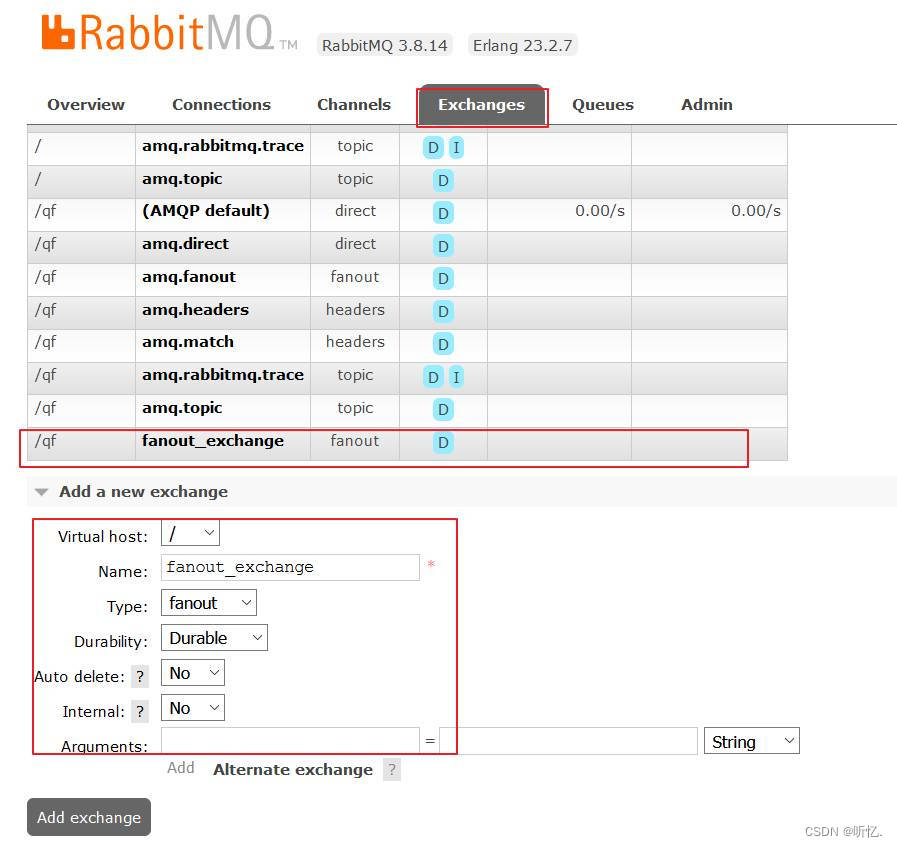
-
创建Exchange交换器
fanout_exchange
-
将创建的fanout_exchange交换器和
ps_queue1,ps_queue2队列绑定

6.4.3 生产者代码
-
rabbitmq_producer项目测试代码如下:
package com.tingyi.test;
import com.tingyi.rabbitmq.ProducerApplication;
import org.junit.Test;
import org.junit.runner.RunWith;
import org.springframework.amqp.rabbit.core.RabbitTemplate;
import org.springframework.beans.factory.annotation.Autowired;
import org.springframework.boot.test.context.SpringBootTest;
import org.springframework.test.context.junit4.SpringRunner;
/**
* @author 听忆
*/
@SpringBootTest(classes = ProducerApplication.class)
@RunWith(SpringRunner.class)
public class TestPubAndSub {
@Autowired
private RabbitTemplate rabbitTemplate;
@Test
public void testPubAndSubSend() {
for(int i = 1; i < 100; i++) {
rabbitTemplate.convertAndSend("fanout_exchange","" , "你好哇,2024听忆 " + i);
}
}
}6.4.4 消费者代码
-
rabbitmq_consumer项目创建监听器:
package com.tingyi.rabbitmq.ps;
import org.springframework.amqp.rabbit.annotation.RabbitHandler;
import org.springframework.amqp.rabbit.annotation.RabbitListener;
import org.springframework.stereotype.Component;
/**
* @author 听忆
*/
@Component
@RabbitListener(queues = "ps_queue1")
public class TestListener1 {
@RabbitHandler
public void testListener(String message) {
System.out.println("======ps_queue1接收到的消息为:======" + message);
}
}-
rabbitmq_consumer项目创建监听器:
package com.tingyi.rabbitmq.ps;
import org.springframework.amqp.rabbit.annotation.RabbitHandler;
import org.springframework.amqp.rabbit.annotation.RabbitListener;
import org.springframework.stereotype.Component;
/**
* @author 听忆
*/
@Component
@RabbitListener(queues = "ps_queue2")
public class TestListener2 {
@RabbitHandler
public void testListener(String message) {
System.out.println("======ps_queue2接收到的消息为:======" + message);
}
}6.5 Routing路由模式
6.5.1 什么是路由模式
路由模式特点:队列与交换机的绑定,不能是任意绑定了,而是要指定一个RoutingKey(路由key)消息的发送方在向 Exchange发送消息时,也必须指定消息的RoutingKey。Exchange不再把消息交给每一个绑定的队列,而是根据消息的Routing Key进行判断,只有队列的Routingkey与消息的Routing key完全一致,才会接收到消息.

图解:
P:生产者,向Exchange发送消息,发送消息时,会指定一个routing key。
X:Exchange(交换机),接收生产者的消息,然后把消息递交给与routing key完全匹配的队列
C1:消费者,其所在队列指定了需要routing key 为 error 的消息
C2:消费者,其所在队列指定了需要routing key 为 info、error、warning 的消息
6.5.2 RabbitMQ管理界面操作
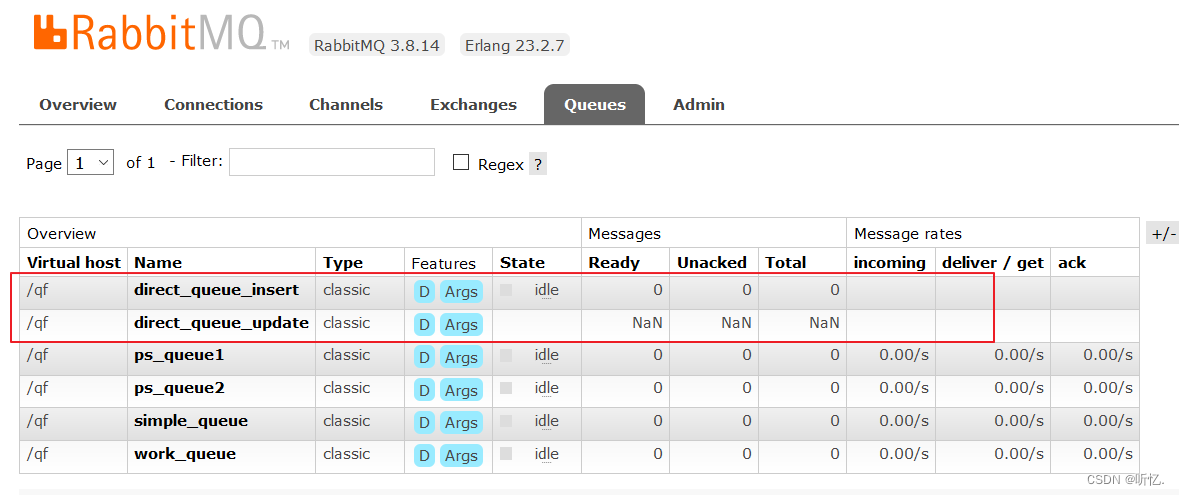
-
创建两个队列分别叫做
direct_queue_insert和direct_queue_update用户演示
-
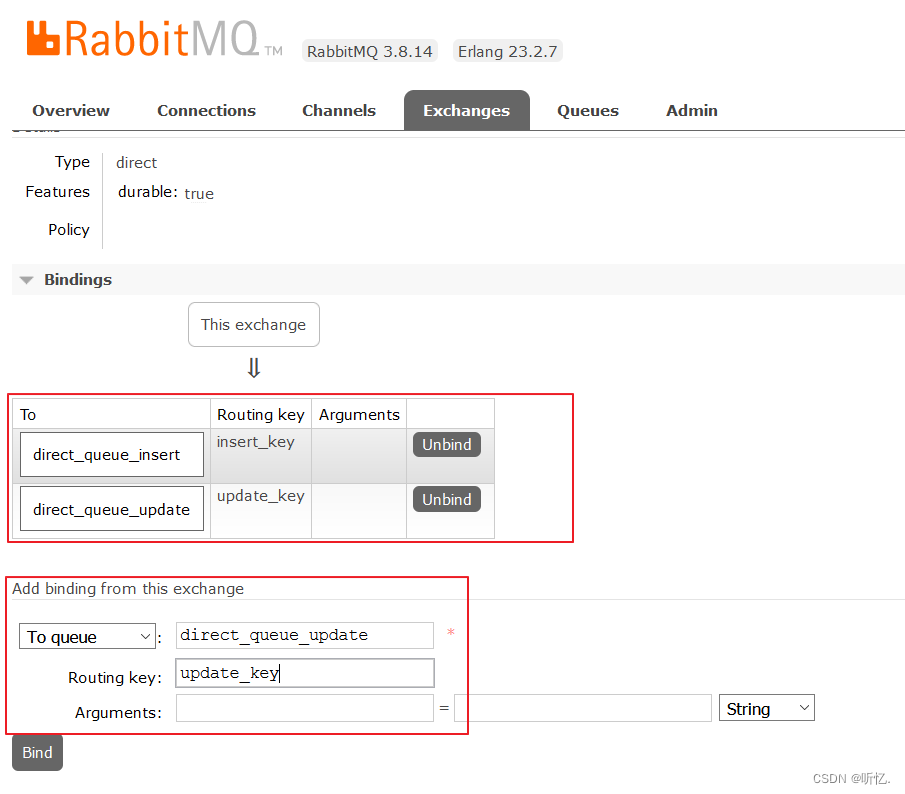
创建交换器
direct_exchange, 类型为direct, 用于演示路由模式

-
设置绑定: 将创建的交换器
direct_exchange和direct_queue_insert,direct_queue_update绑定在一起, 路由键Routing Key分别为insertKey和updateKey
6.5.3 生产者代码
-
rabbitmq_producer项目测试代码如下:
package com.tingyi.test;
import com.tingyi.rabbitmq.ProducerApplication;
import org.junit.Test;
import org.junit.runner.RunWith;
import org.springframework.amqp.rabbit.core.RabbitTemplate;
import org.springframework.beans.factory.annotation.Autowired;
import org.springframework.boot.test.context.SpringBootTest;
import org.springframework.test.context.junit4.SpringRunner;
/**
* @author 听忆
*/
@SpringBootTest(classes = ProducerApplication.class)
@RunWith(SpringRunner.class)
public class TestRouting {
@Autowired
private RabbitTemplate rabbitTemplate;
@Test
public void testPubAndSubSend() {
for(int i = 1; i < 100; i++) {
if (i % 2 == 0) {
rabbitTemplate.convertAndSend("direct_exchange","insert_key" , "你好, 2024听忆" + i);
} else {
rabbitTemplate.convertAndSend("direct_exchange","update_key" , "你好, 小崔" + i);
}
}
}
}6.5.4 消费者代码
-
rabbitmq_consumer项目创建监听器:
package com.tingyi.rabbitmq.routing;
import org.springframework.amqp.rabbit.annotation.RabbitHandler;
import org.springframework.amqp.rabbit.annotation.RabbitListener;
import org.springframework.stereotype.Component;
/**
* @author 听忆
*/
@Component
@RabbitListener(queues = "direct_queue_insert")
public class TestInsertListener {
@RabbitHandler
public void testListener(String message) {
System.out.println("======test1_queue接收到的消息为:======" + message);
}
}-
rabbitmq_consumer项目创建监听器:
package com.tingyi.rabbitmq.routing;
import org.springframework.amqp.rabbit.annotation.RabbitHandler;
import org.springframework.amqp.rabbit.annotation.RabbitListener;
import org.springframework.stereotype.Component;
/**
* @author 听忆
*/
@Component
@RabbitListener(queues = "direct_queue_update")
public class TestUpdateListener {
@RabbitHandler
public void testListener(String message) {
System.out.println("======test2_queue接收到的消息为:======" + message);
}
}6.6 Topics通配符模式(主题模式)
6.6.1 什么是通配符(主题)模式
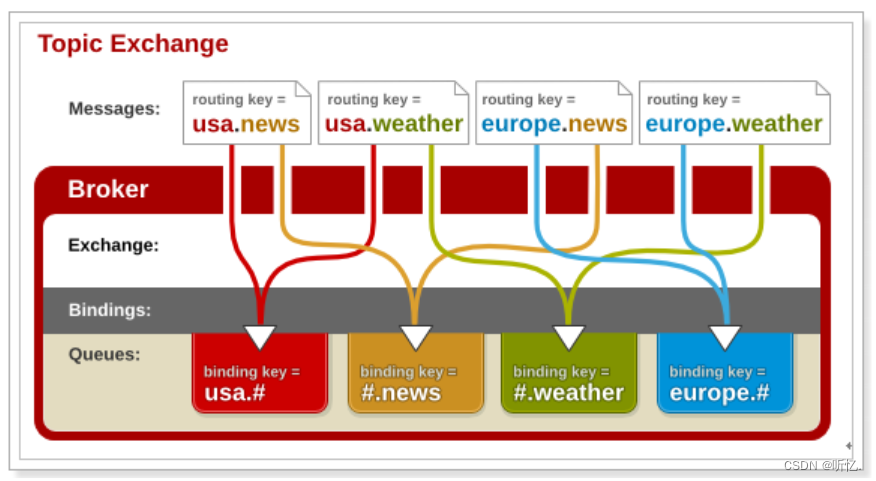
Topic类型与Direct相比,都是可以根据RoutingKey把消息路由到不同的队列。只不过Topic类型Exchange可以让队列在绑定Routing key的时候使用通配符!
Routingkey: 一般都是有一个或多个单词组成,多个单词之间以”.”分割,例如:item.insert
通配符规则:
#:匹配一个或多个
*:匹配不多不少恰好1个词
举例:
item.#: 能够匹配item.insert.abc或者item.insert
item.*:只能匹配item.insert item.update
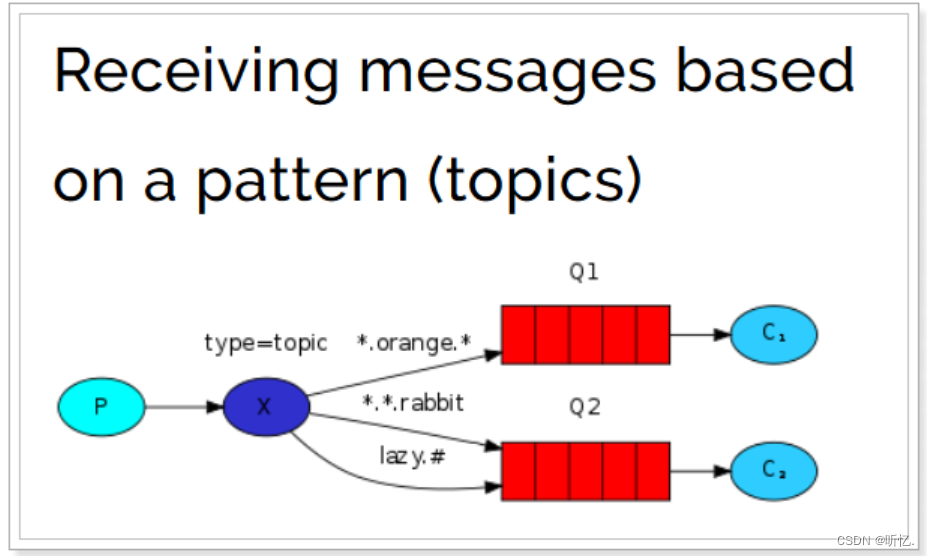
图解:
-
红色Queue:绑定的是
usa.#,因此凡是以usa.开头的routing key都会被匹配到 -
黄色Queue:绑定的是
#.news,因此凡是以.news结尾的routing key都会被匹配
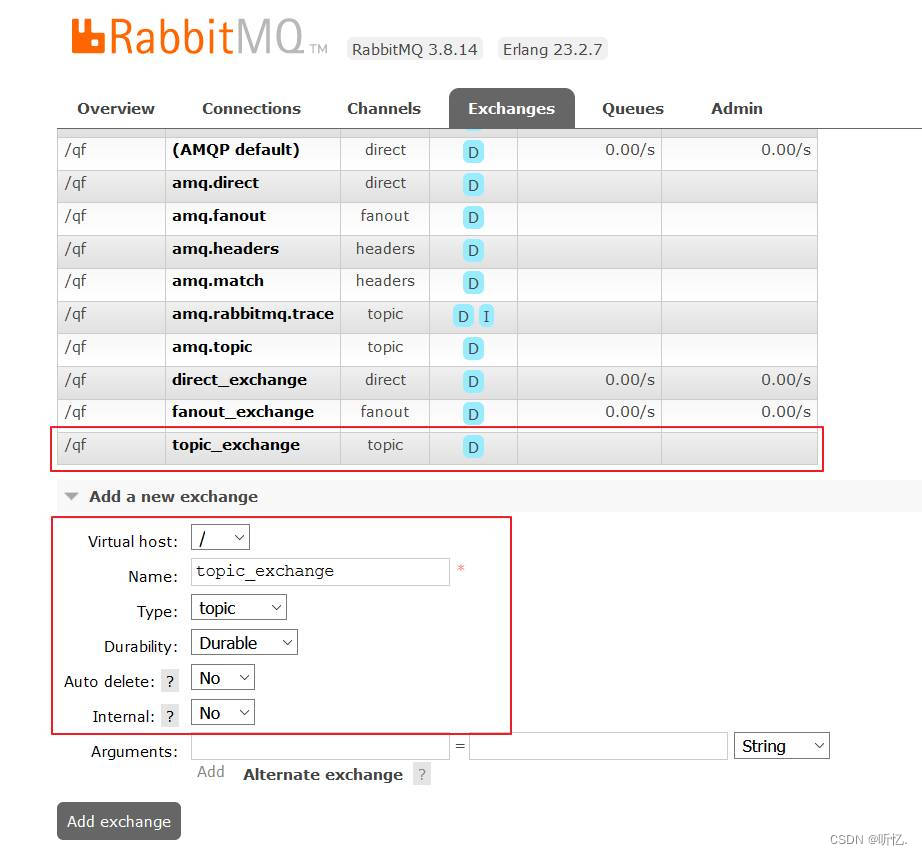
6.6.2 RabbitMQ管理界面操作
-
创建队列
topic_queue1和topic_queue1

-
创建交换器
topic_exchange, type类型为topic
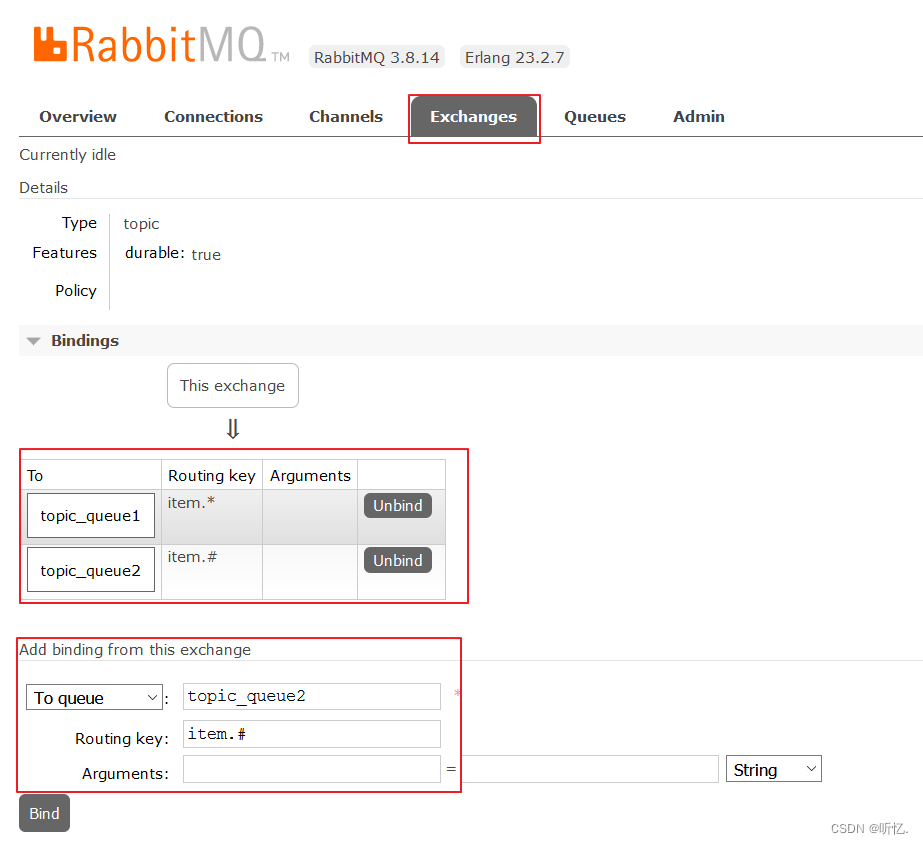
-
设置绑定:
topic_queue1绑定的Routing Key路由键为item.*
topic_queue2绑定的Routing Key路由键为item.#
6.6.3 生产者代码
-
rabbitmq_producer项目测试代码如下:
package com.tingyi.test;
import com.tingyi.rabbitmq.ProducerApplication;
import org.junit.Test;
import org.junit.runner.RunWith;
import org.springframework.amqp.rabbit.core.RabbitTemplate;
import org.springframework.beans.factory.annotation.Autowired;
import org.springframework.boot.test.context.SpringBootTest;
import org.springframework.test.context.junit4.SpringRunner;
/**
* @author 听忆
*/
@SpringBootTest(classes = ProducerApplication.class)
@RunWith(SpringRunner.class)
public class TestTopic {
@Autowired
private RabbitTemplate rabbitTemplate;
@Test
public void testTopicSend() {
rabbitTemplate.convertAndSend("topic_exchange","item.select" , "你好, 2024听忆");
rabbitTemplate.convertAndSend("topic_exchange","item.select.abc" , "你好, 2024小崔");
}
}6.6.4 消费者代码
-
rabbitmq_consumer项目创建监听器:
package com.tingyi.rabbitmq.topic;
import org.springframework.amqp.rabbit.annotation.RabbitHandler;
import org.springframework.amqp.rabbit.annotation.RabbitListener;
import org.springframework.stereotype.Component;
/**
* @author 听忆
*/
@Component
@RabbitListener(queues = "topic_queue1")
public class TestTopicListener1 {
@RabbitHandler
public void testListener(String message) {
System.out.println("======topic_queue1接收到的消息为:======" + message);
}
}-
rabbitmq_consumer项目创建监听器:
package com.tingyi.rabbitmq.topic;
import org.springframework.amqp.rabbit.annotation.RabbitHandler;
import org.springframework.amqp.rabbit.annotation.RabbitListener;
import org.springframework.stereotype.Component;
/**
* @author 听忆
*/
@Component
@RabbitListener(queues = "topic_queue2")
public class TestTopicListener2 {
@RabbitHandler
public void testListener(String message) {
System.out.println("======topic_queue2接收到的消息为:======" + message);
}
}6.7 模式总结RabbitMQ
工作模式:
1、简单模式 HelloWorld : 一个生产者、一个消费者,不需要设置交换机(使用默认的交换机)
2、工作队列模式 Work Queue: 一个生产者、多个消费者(竞争关系),不需要设置交换机(使用默认的交换机)
3、发布订阅模式 Publish/subscribe: 需要设置类型为fanout的交换机,并且交换机和队列进行绑定,当发送消息到交换机后,交换机会将消息发送到绑定的队列
4、路由模式 Routing: 需要设置类型为direct的交换机,交换机和队列进行绑定,并且指定routing key,当发送消息到交换机后,交换机会根据routing key将消息发送到对应的队列
5、通配符模式 Topic: 需要设置类型为topic的交换机,交换机和队列进行绑定,并且指定通配符方式的routing key,当发送消息到交换机后,交换机会根据routing key将消息发送到对应的队列
6.8 使用代码创建队列和交换机
6.8.1 初始化exchange、queue
-
下面初始化队列和交换器类放在消费方和生产方都可以.
package com.tingyi.rabbitmq.config;
import org.springframework.amqp.core.Binding;
import org.springframework.amqp.core.BindingBuilder;
import org.springframework.amqp.core.Queue;
import org.springframework.amqp.core.TopicExchange;
import org.springframework.context.annotation.Bean;
import org.springframework.context.annotation.Configuration;
/**
* @author 听忆
*/
@Configuration
public class RabbitMQConfig {
/**
* 1. 创建exchange - topic
* 第一个参数: 交换器名称
* 第二个参数: 交换器是否持久化, 也就是服务器重启交换器是否自动删除
* 第三个参数: 如果没有消费者, 交换器是否自动删除
*/
@Bean
public TopicExchange getTopicExchange(){
return new TopicExchange("boot-topic-exchange",true,false);
}
/**
* 2. 创建queue
* 第一个参数: 队列名称
* 第二个参数: 队列是否持久化, 也就是服务器重启队列是否自动删除
* 第三个参数: 是否排外的,有两个作用,
* 1.当连接关闭时该队列是否会自动删除;
* 2.该队列是否是私有的private,如果不是排外的,
* 可以使用两个消费者都访问同一个队列,没有任何问题,如果是排外的,
* 会对当前队列加锁,其他通道channel是不能访问的
* 第四个参数: 队列是否自动删除, 也就是当没有消费者时, 队列是否自动删除
* 第五个参数: 队列参数, 比如是否设置为延时队列等参数.
*/
@Bean
public Queue getQueue(){
return new Queue("boot-queue",true,false,false,null);
}
/**
* 3. 队列和交换器绑定在一起
*/
@Bean
public Binding getBinding(TopicExchange topicExchange,Queue queue){
return BindingBuilder.bind(queue).to(topicExchange).with("*.red.*");
}
}6.8.2 发布消息到RabbitMQ
@Autowired
private RabbitTemplate rabbitTemplate;
@Test
public void testContextLoads() {
rabbitTemplate.convertAndSend("boot-topic-exchange","slow.red.dog","听忆哇!!");
}6.8.3 创建消费者监听消息
package com.tingyi.rabbitmq.topic;
import org.springframework.amqp.rabbit.annotation.RabbitListener;
import org.springframework.stereotype.Component;
/**
* @author 听忆
*/
@Component
public class Consumer {
@RabbitListener(queues = "boot-queue")
public void getMessage(Object message){
System.out.println("接收到消息:" + message);
}
}